Showing posts with label sewing. Show all posts

Friday, 8 June 2018

My Sewing Machines

Today I thought I'd share my sewing machines with you!

My original machine is a John Lewis JL125 that I got for my birthday from my mum and dad quite a few years ago.


Until just before I started this blog, it hadn't really been used that much. I'd used it to whip up a huge collection of drawstring bags and that was about it. However since I started sewing seriously, it has pretty much been in constant use. In fact I think it is about time I got it serviced.

It's a fairly basic model but covers everything I needed at the time. Unfortunately you can no longer buy this model from John Lewis but they have similar models in the same price range. John Lewis machines are made by Janome so I would recommend them. You can get the JL110 which is a great value beginner's machine.

It has a range of stitches, and came with a a zig-zag foot and 4 step buttonhole foot which is a bit tricky to use I will be honest. I have so far bought a rolled hem foot, invisible zipper foot, a walking foot and a quarter-inch foot (all made by Janome).

I also recommend this book which is a brilliant guide if you are looking to get the most out of your accessories.


I also have an overlocker, a Brother 1034D, which I have had for a couple of years now. It's a fairly basic model but it does all I need, although I still am finding my way with it to be honest. A quick google search tells me that this model has been replaced by the 2104D overlocker.


Also with the overlocker were included three different feet - a blind hem foot, a piping foot and a gathering foot, none of which I have a clue how to use yet!! The only thing I can fault with this is that it does not have a thread cutter which is a bit annoying sometimes.

Yes an overlocker can be a bit daunting, but I'm glad I have one. I am slowly learning my way about it, but don't feel I am using it to it's full potential yet! I recommend this book for anyone wanting to learn more about their overlocker.


My final machine, is a Janome TXL607, a fully computerised machine. This is on "permanent" loan to me as my mum upgraded from her Bernina that she had had for over 25 years to this model. However, she is a real Bernina lover and although she liked this machine, I think she prefers a Bernina so she upgraded again, and loaned me this machine! Aren't I lucky!


This is a fantastic machine and although to be honest it probably has more functions than I need as it is a quilters machine I think. It has an amazing range of stitch patterns, and has an automatic buttonhole foot which is something my manual machine didn't have, thank goodness!

Oh and we also have a John Lewis mini which isn't my machine, but is my daughter's! It's a great little starter machine, and it is a real shame that John Lewis have stopped making these. Sorry no photo as it is in its box at the moment!


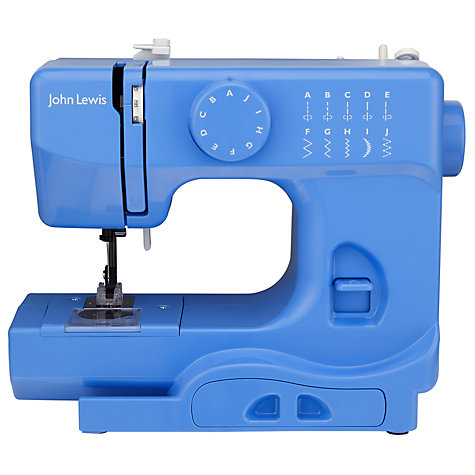
Image from www.johnlewis.com 

I'd love to hear what machines you sew on, so please add your comments here.

Catherine x

NB This page contains affiliate links to Amazon. If you chose to purchase a book, I may receive a small commission and you are helping support this blog. I only recommend books or products that I have personally used and enjoy. 

Wednesday, 30 May 2018

Simple Tote Bag from Learn to Sew with Lauren

Finally some sewing! This is the Simple Tote Bag from "Learn to Sew with Lauren" by Lauren Guthrie that I previously reviewed here.


I was in need of a new bag for my knitting projects so though I would knock one up.

The tote is a very simple make and would make a great first project for someone learning to sew. 


It is a simple design with a front pocket but there is also an option to add trim and to divide the pocket into two sections.


If you were a beginner and you made this bag you would learn how to sew straight seams and to make a buttonhole, which can be very scary if your machine is playing up!


I made my tote bag from some scraps of cotton linen mix that I had left over and the front pocket is made from a fat quarter. The button is from my stash too.


So all in all a great stashbusting project!

Catherine x

NB This post contains an affiliate link. If you chose to purchase this book, I will receive a small commission and you are helping support this blog. I only recommend books or products that I personally have used and enjoy.

Monday, 2 January 2017

2016 - A Review of the Year

Hello everyone

I thought it would be a good idea to do a quick review of 2016 as I didn't join in #sewingtopfive  this year. 2016 has been an okay year but not that successful in sewing terms.  I started a new job in January 2016 which has gone really well, and initially I managed to find some time for sewing.

In April, I  spent a long weekend in Bath and visited the Fashion Museum which is well worth paying a visit.


I spent a gorgeous two weeks in France in August and I was full of plans to make a summer wardrobe but it never happened.

We had gorgeous weather while we were away and my family and I enjoyed strolls on the beach every evening. Here is one of the lovely sunsets...

I found it increasingly difficult to find time to sew in the second half of the year, and neglected the blog as life got pretty busy.

I also went to the Knitting & Stitching Show in both March and October and bought lots of nice goodies to add to my stash....

So what have I made this year? I did manage some sewing, and I did quite a bit of knitting though and managed to finish some WIPs.

My makes in 2016

Slouchy knitted hat - Sirdar 9184 (unblogged)
Shawl neck knitted waistcoat - Sirdar 9249
New Look 6262
Emery Dress
Sew Over It Betty Dress (unblogged)
Washi Dress - unfinished. I made this previously (see my post here) and had great success but this one just went wrong from start to finish, so is waiting to be recycled into something else. 
New Look 6483
Sylvie Dress
The Flame tunic - Sirdar 7188 (unblogged)


Cable socks
Oak Ribbed Socks (unblogged)


These were a Christmas gift for my sister and I finished them on Christmas Eve, just in the nick of time. 

As you can see less sewing happened this year than in previous years.

The make I'm most proud of is the Emery Dress.  I took my time over this pattern and learnt some new skills such as lining the bodice and setting in sleeves successfully. 


My most worn garment was New Look 6483.  Although this was a relatively simple pattern, I successfully altered the pattern to fit using a FBA.  I wore this a lot, and it is a super pattern that I will revisit.


My least worn garment was the Betty Dress. I love this pattern but I tried a full bust adjustment and I don't think it was very successful.  The straps fall down also and the circle skirt is not really my style.


I also need to add a hook and eye to the back to make this wearable as I inserted the zip rather too low.


My aims for 2017

1) To make myself a dedicated sewing area.  At the moment I do not have a dedicated area for sewing although I have plenty of space. I tend to sew on the dining room table which is in my back room, therefore I either have to get my machine out if I plan to sew or it sits there taking up lots of space, and the dining table is out of action. I am planning on purchasing a small desk to put either in this room or in my bedroom so my machines have a permanent home.

2) To sew more wardrobe basics.  I started this blog with the aim of making clothes to wear on an everyday basis and to be honest my wardrobe is looking pretty sparse at the moment. With the exception of New Look 6483, I only made dresses which apart from the Sylvie Dress didn't get that much wear.  I have to accept I cannot sew a completely homemade wardrobe as I simply don't have the time, but I can get smarter about what I make. I do need to invest in some basics like jeans and t-shirts but I will think about the gaps in my wardrobe and start making things that I need rather than pretty dresses. 

3) To try some new knitting techniques - I have been knitting for years but I'm keen to learn some new things. I have always been an avid knitter and I have really enjoyed knitting a lot this year, so you may see more knitting on this blog from now on.  The thing I like about knitting is that you can pick it up at any time and it is much more portable and social, as you can knit and watch telly with the rest of the family whereas sewing seems to be something I do when I am on my own. 

4) To improve my photography skills.  I would really like to improve the photographs that I take for this blog, and to be honest this is the most challenging aspect of blogging.  Not sure if I need to invest in a new camera or learn more about how to take photographs, so this is one to think about!  Any advice would be gratefully received.

5) To blog regularly! As I mentioned, I found it difficult to find time to blog in the second half of this year, and ended up neglecting the blog. I really enjoy reading other blogs and hope that other people like reading what I have to say too.  I hope to post a couple of times a month as a minimum, perhaps sharing more of my WIPs and posting about other things if I feel like it, not just my finished makes.

All that remains to say is thank you to anyone who has read my blog in the past year or left any comments for me. I love hearing from you so it would make my day if you left me a comment or two if you liked something I've made or have any helpful suggestions.

Wishing you all the best for 2017!

Catherine x

Monday, 18 July 2016

The Sylvie Dress...a perfect summer dress

Let me introduce you to my latest make - the Sylvie Dress by Christine Haynes. It was a lovely day on Saturday so I persuaded my daughter to take some pictures.  As you can see I am squinting terribly, and Oscar was keen to get in on the action as usual!


There are two different versions of this pattern that you can make. Both versions of the dress feature an unlined sleeveless bodice with three small darts under the bust and a wide lined waistband. I will point out that the waistband looks much thinner on the pattern illustration that it actually is. The waistband is lined and interfaced which gives this section some structure.


The back bodice has darts and the neckline and armholes are finished with bias binding. View A has a gathered dirndl skirt which is basically a rectangle of fabric. The dirndl skirt also has large patch pockets.  View B has piping and a fitted pencil skirt. The illustration makes this look more like an an A-line skirt than the photos on Christine Haynes's website. I chose to make View A as this is more my personal style.


For my dress, I chose to use a polycotton that I picked up for £3 a metre in Hobbycraft. I decided not to make a muslin as the dress didn't seem like it was going to be too fitted but I didn't want to take a chance with expensive fabric. I bought two metres which was enough to cut the dress and the binding although I did have to join my bias strips together rather than using continuous pieces as per the pattern. The pattern calls for 2.75 m of 150m wide fabric or 3.3m of 115m wide fabric so you can certainly save on fabric requirements if you used ready-made bias binding. I think this fabric requirement also takes into account the amount required if your fabric has a one-directional print.


I made a size 8 based on my measurements (36 inch bust) and I made no adjustments at all.  I have to say the fit is pretty good.  It's fitted but not too tight, so makes a nice dress to wear on a hot summer's day.


The dress was easy to sew together and the instructions were very clear and detailed.  The most time consuming part of making this dress was the bias bound neckline and armholes.  I found this quite fiddly and time consuming. The pattern uses double fold bias binding rather than single fold binding, which is basically single fold pressed in half again.  The pattern instructs you how to make you own double fold bias binding. The instructions on how to attach the bias binding are super detailed, however this part can be a little confusing. There are loads of brilliant tutorials on how to use bias binding including this one on Christine Haynes' website.  I posted a comment to ask her whether I could use single fold bias binding and this is her reply:

 "Hi Catherine! Yes, it is 100% personal preference. So if you prefer single fold bias tape, you can absolutely use that in place of the double fold. From teaching I've found that my students prefer the double fold, so that's how I got in the habit of using it. But by all means use the one that you prefer. Glad you like the Sylvie Dress! Thank you!"

It was lovely to get such a detailed personal response.

I think when I make this dress again (and I am planning my next), I will draft an all-in-one facing and see if I prefer that finish.  That said my bias binding is pretty neat but I do feel like the neckline stretched out slightly despite stay-stitching. The only other change I made was to leave the pockets off as I couldn't quite get my pockets the same size.  I think I will make a card template next time and use this to press my pockets into shape. 


My invisible zip is really neat and I am getting really good at inserting them.  The only thing I still find really tricky is closing the gap at the bottom of the zipper tape.  Any tips on how to do this?  I inserted it a little low so also need to add a hook and eye. 


So to sum it up, the Sylvie Dress is a great pattern. It was fairly easy to make and I think an ambitious beginner could certainly tackle view A, although view B might be a bit more tricky.  I am surprised how few Sylvie dresses there seem to be out there in the blogosphere, given what a great pattern designer Christine Hayne's is and how popular the Emery Dress is.  The Sylvie Dress is a perfect dress for a summer's day and is super wearable.

I hope I've inspired you to give this pattern a shot.  I'd love to hear from you if you do make it or if you have any other perfect summer dresses to recommend.

Catherine
x

Saturday, 14 May 2016

New Look 6483.... in less than a week

My last post was a round up of my favourite simple sewing patterns in my stash. I've finished my first make, New Look 6483! And it look me less than a week! I spent a bit of time adjusting the pattern last weekend, and then it probably took two evenings of sewing plus a little bit of of  extra time hand sewing. Not bad for me!


The pattern came free with Sew Magazine this month. It comes with 5 different options. I chose view E with the wider neckline as I felt this was the most flattering.  The suggested fabrics are ginghams, laundered cottons (which is just cotton that has been washed to remove the stiffness caused by the sizing), silks, silk types, rayons etc. So fabric with a bit of drape is required.


The top does not have a zip and is fasten with a simple thread loop and button.  There is an all in one facing for the neck and armholes. The pattern is rated "easy" and claims to take one hour to sew! (not including cutting out time etc).


However, my major rookie mistake on this pattern was not reading the instructions through fully before starting!  I was merrily sewing along following the instructions for view A, and when I came to attach the facing I realized that View B-E are constructed in a different way.  Out came the seam ripper! Note to self always read the instructions fully before starting.


While this is a fairly simple make in the fact that there is no zip, I'd actually say the finishing of the facing is quite tricky and a beginner might struggle with this. This was a new technique to me although I have done an all in one facing before on my Simplicity 1609 dress, this version was constructed differently. The facing is attached the neck edge and armholes then turned to the inside. The shoulder seams are then sewn being careful not to catch the pressed edge of the facing in the stitching. The shoulder seams are then slipped under the facing, and the edges of the facing are slipped stitched together, like I said, quite tricky!


The top has slits at the sides and these are finished with mitred corners.  This is quite tricky too and this was also a new technique to me.  I do love it though when you learn new things along the way!


I also couldn't remember for the life of me how to do the thread loop either so this video on youtube came in handy! I also made a self covered button to match the top.


My material came from the market stall in St Albans where I often pick up fabric.  It cost £3 for a metre and is 100% cotton.  I also noticed he had the same fabric in white, so may go back to get some more if he still has it.

Button, thread, interfacing all came from my stash and the pattern was free with Sew magazine so this beauty of a top cost me £3 to make!


With regards to sizing, I decided to take a new approach.  I got Fit for Real People for my birthday and I used this to help.  Fit for Real People is a brilliant book, it looks really dated but there is so much useful information in there, I thoroughly recommend buying it if you are looking for fitting advice.

I made a similar top when I started blogging, New Look 6356 in a size 14, based on my bust size, and that came out huge before I adjusted the back. So this time, I took my high bust measurement and cut out a size 10 based on this measurement.  I then tried on the tissue which is tricky on your own, believe me, and measured to the centre front.  I needed to make a 5/8 inch bust adjustment which I did to the paper pattern. I then decided to just go ahead and make my top as the material was inexpensive and I had done most of the fitting with the tissue pattern.


Anyway the result is pretty good I think! It was a lovely day today and I was able to get some photos in the garden for a change.  Oscar was keen to join in with the fun too. It was very bright today so apologies for the squinting.

I'm really pleased with the fit of this top. The top fits nicely round the bust and the back is not too wide.  There is maybe a slight gaping at the back neckline but nothing like I have had before.  I think I need now to adjust for a slight round neck which involves adding an extra wedge of the material to the back neckline to raise it slightly so that it doesn't gape away from the curve of the back.


I thoroughly recommend New Look 6483 as it is a great little wardrobe builder. It's exactly the sort of top I can wear to work or dress down with jeans.  I can definitely see me making some more of these, especially as it can be squeezed out of a metre of fabric!

Anyone else made this pattern, I would love to hear from you?  And if you made it in an hour, I'm mightily impressed!

Catherine x

Monday, 18 April 2016

Setting in sleeves. How do you do it?

To be honest I have always had difficulty setting in sleeves. Often I catch the garment in the seam, and I always seem to have some little puckers in the sleeve head no matter how hard I try. The result is much frustration and lots of unpicking!

The method I've always used, involves sewing two rows of long ease stitching and pulling up to fit, then trying to smooth out the gathers to fit, and then pinning and machining sleeve side up.

Having failed to set the sleeve in successfully on my latest make, the Emery dress despite the following the excellent instructions on Christine Haynes' sewalong, I thought I'd see if there were any other methods that might work better for me.

Anyway after a quick Internet search. I found this post on Craftsy for a method that involves pinning only! I won't go into too much detail as the blog post on Craftsy is really thorough, but I thought it was worth sharing. 

The key thing to learn from this is that strategic pinning can replace using ease stitches.  The pins should be placed so that they straddle the stitching channel. It also helps to hand baste the sleeve first.  While this may seem extra work, if you are going to have to spend time unpicking your sleeve when it goes wrong, it seems like time well spent to me. Stitching the other way up, with the garment facing upwards, rather than the sleeve as normally advised, allows the feed dogs to help ease the sleeve into place.

One extra thing that I have decided to do from now in is mark the stitching line in with chalk pencil as I don't think previously that my stitching line was very accurate.

The basics steps are as follows

1.Stitching line marked with chalk pencil

Setting in sleeves - mark stitching line

2. Key points pinned first - notches, underarm seam, ease points and shoulder point

Setting in sleeves -  Key points pinned first - notches, underarm seam, ease points and shoulder point

3. Then use lots of pins to ease the sleeve head in

Setting in sleeves - use lots of pins to ease the sleeve head in


4. The seam can then hand-basted and pins can be removed

Setting in sleeves - seam hand-basted and pins can be removed

5. Finally the seam is machine sewn with the garment facing, using the feed dogs to help ease the sleeve in. 
Setting in sleeves - seam is machine sewn with the garment facing, using the feed dogs to help ease the sleeve in.

If you look closely you can see that I had to unpick the sleeve twice before trying this method!

6. The result is a sleeve that are set in properly with no little puckers or gathers. 

Setting in sleeves -sleeves set in properly with no little puckers or gathers.


The good news my Emery dress is nearly complete and I will have a finished make to share with you soon.

Have you tried this method? I am converted. 

Catherine x

Wednesday, 13 April 2016

The Daisy New Look 6262

So I made New Look 6262 again! I finished this a few weeks ago and if you read my blog you will know that I am now stitching the Emery Dress but I thought I should blog this as I had some photos!

New Look 6262 - dress with gathered sleeve, boat neck and short sleeves


I have made New Look 6262 four times now and I am pretty pleased overall with the fit of this dress. It's a simple dress with bust and waist darts and a gathered skirt, so very wardrobe friendly. I have made changes to the fit of the bodice previously, if you want to read my post here.


It can be made with or without sleeves.This is the second time I have made it with the full sleeves and to be honest there is something not quite right about them.  They don't seem to sit quite right and they pull the bodice slightly I think.  I am sure that I read somewhere  that bodices for sleeve dresses and for sleeved dresses are shaped differently so maybe that is what is wrong as this pattern uses the same pattern piece both both styles of dresses.  Anyone know more about this?

 Anyway it works better as a sleeveless dress I think, although I am still pleased with this dress, and have been wearing it lots.  I think if I was to make it again, I would leave the sleeves off or stick to the little cap sleeves.

New Look 6262 - dress with gathered sleeve, boat neck and short sleeves

The material was lovely to sew with and is a fine cotton from John Lewis. It sticks terribly to tights though so I am wearing a full slip under the dress which may account for some of the odd looking rumples on the bodice.  The other thing is I have lost weight since I fitted this pattern originally so I probably need to go back to the original pattern and start again :(


New Look 6262 - dress with gathered sleeve, boat neck and short sleeves

I wore this dress out on a recent trip to London with my family.  A nice lady stopped me on the tube, and said "I like your dress", It was so nice to be able to say, "Thank you, I made it myself!"

New Look 6262 - dress with gathered sleeve, boat neck and short sleeves

Can you see Oscar photo-bombing?

Catherine x

Popular Posts