 |
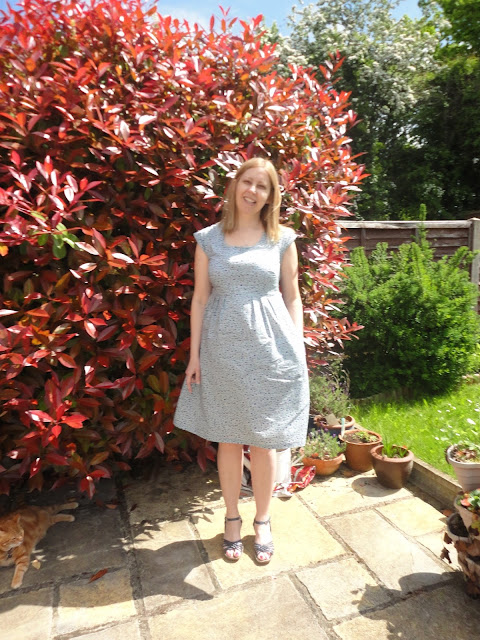
| Can you see Oscar? |
The Washi dress is a simple make, and perfect for beginner dressmakers.
| Washi dress by Made by Rae |
There is also a Washi dress expansion pack which can be purchased if you want to add further looks.
| Washi dress expansion pack by Made by Rae |
I also found that there is a free tutorial and pattern piece for long sleeves that can be downloaded here, so there are lots of options for this dress.
Based on my high bust measurement, I decided to make a size M. In the instructions, Rae recommends making a muslin of the bodice. I did this for the first time ever using an old pillow case and was very glad as it was clear I needed a full bust adjustment (FBA). I followed the tutorial that can be found on Simplicity's website for increasing the size of a dart. I did a one inch FBA. I also lowered the bust dart by adding an inch below the armhole.
Remember any changes you make to the bodice pattern piece, you have to also make the back pattern piece!
This lengthened the bodice and on making my second pillow case muslin, I decided I had a good fit and could cut in to my material!
The dress was fairly easy to construct and the instructions are very detailed and clear. They are also fully illustrated with either drawings or photos. The darts are french darts which I'd not come across before. The other unusual thing is that the seam allowances are either 1/4 inch at the armhole and neckline or 1/2 inch at the side and shoulder seams instead of the usual 5/8 inches.
The skirt is pleated and then sewn to the front bodice.
The back bodice is then shirred. I hand winded the shirring elastic bobbin and then sewed in straight rows using the normal thread in the needle, pulling the material straight as I sewed across after the first row. Rae gives a lot of information about how to shirr with elastic thread and if it's the first time you've done it like me, you will find this very useful.
The dress is faced at the neckline and then once the sleeves are attached, bias binding is applied at the armholes. I decided to stitch mine on the outside as my hand-sewing is not great, I made my own bias binding using the same fabric and I'm pretty pleased with the results. I had to give it a real blast of steam to get a few wrinkles out though.
Finally I machine hemmed the dress. I didn't change the length of the dress as I liked it as it was.
I'm sure I will make dress again! I might leave out the pockets as I think the skirt would sit better without them. There is a tiny back neckline gape that I could fix but it's really not that noticeable.
I also think I need to invest in a tailor's ham for pressing those bust darts.
Have you made the Washi dress yet and do you love it too?
Catherine x


Such a lovely dress - well done!! x
ReplyDeleteThank you, it's very comfy to wear x
DeleteI'm really admiring this dress.The pleats under the bust are really flattering.
ReplyDeleteThank you. I think I have finally made a dress that suits me!
DeleteHello! I love your version and admire your clever fitting adjustments too. Ashamed to say i have yet to make this gem of a dress!
ReplyDeleteIt will go on my never ending want to sew list!!
bestest daisy j x
Hello thank you. First time I have done any fitting adjustments like this, it was a bit nerve-wracking but totally worth it. I will definitely be making this dress again :) x
DeleteGreat job on the dress - very pretty and looks great on you. I am putting the pieces of the pattern together tonight with hopes to sew tomorrow
ReplyDeleteThanks Karen - I hope it turned out well x
DeleteThis is such a cute dress!
ReplyDeleteThanks :)
Delete